Tuesday 31 March 2015

The Giving Bunny Project

Earlier today I checked out Urban Threads to check out the free design.  It was a design that I was interested in, which led me to look at what else they have.

I found their designs for the Giving Bunny Project.  For anyone who has been reading my posts - you will know that I've been playing around with in the hoop projects.

It didn't take me long to decide to make some bunnies to give away.   My first plan: make a new file so that I can do 6 at a time (otherwise what is the point of having the big frame?!?!)   Of course I took the opportunity to add some extra embroidery details to my bunnies.


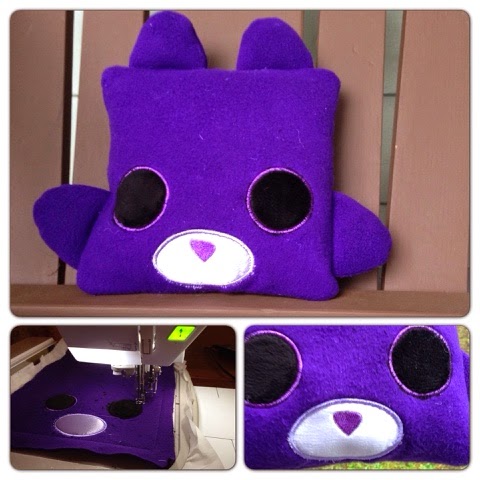
Here are the bunnies waiting to become stuffed


Stuffed and sewn - just waiting to be named.


And finally with names - waiting to be taken out into the real world.
Meet Misti, Shawna, Beauregard (or Bo for short), Rosie, Oren & Flossie.


Have any of you done this?  I'm wondering what colour my next bunnies will be or what details they will have on them.

So cute, so fun to do, and hopefully will make someone smile.

If you use Instagram - check out #givingbunny, #givingbunnies #givingbunnyproject


Saturday 28 March 2015

Doll clothes in the hoop

I recently shared some doll accessories I made and how it is a friend who is into making clothes for her dolls that started me on that path.

What I didn't mention - is that I learned to sew because I wanted to make doll clothes.  I was 7 and figured out how to use the machine by watching my mother.

Last night I was looking at free patterns available on the internet and wondering what things I could make fully or partially in the hoop.

Mitts and Touque


I found a cute little pattern for mitts and a touque from Many Small Friends.  I decided to digitize what parts I could in the hoop.

First up the mitts:
1: Stitches out the basic mitt pattern


2: Embroiders a snowflake
3: Add another layer of fleece and stitches out cutting line and the ribbing pieces.


Next up the toque:  5 pieces for the top 

Step1: stitches a fold line (on the very left) - the rest of the rectangle is just to keep the fleece in place
Stitches cutting line for the front piece 
Step 2: Stitches the snowflake on the front


Step 3: Fold over the fabric on the left on the fold line and stitches the cutting out lines:
  • one top section on fold (at left), 
  • 2 sets of top sections
  • 1 hat band on fold


Step 4: Stitching lines 
  • sews 2 sets of top sections together - will end up with 2 sections with 2 and a separate single section
  • sews the hat band together.


My friend did the rest of the stitching.   The hat worked perfectly - but because I wasn't careful about how I put the fleece in the hoop for the mitts - the stretch was in the wrong direction - so they don't fit properly (don't stretch to fit over her thumb) - so I have to go back to the drawing board on that one.


Beret

This was stitched entirely in the hoop.   Not at all hard to digitize - just some circles for cutting lines - and another circle to stitch the two layers together.


Dress Bodice

I wanted to investigate making a doll bodice in the hoop - the possibilities for interesting edge finishes are endless.   I made a pattern for a full bodice that would result in a lined bodice in just a little bit of stitching.

I didn't take any pictures of the stitching out, but I did take a picture of the design on my computer screen.


This is a picture of the first fitting of the bodice.


Now to try some fancy edging...


Wednesday 25 March 2015

Doll accessories


So I have a friend who used my embroidery machine to embroider lots of things that will be made into doll clothes.

Yeah, she's a bit obsessed with dressing up the dolls and taking pictures of them. 

One outfit is an Elf Princess dress so another friend and I worked together to make the doll a circlet


After making the monster stuffy, I realized that it would be pretty easy to make a teddy bear for her dolls too.  I digitized an In the hoop design. 


Not stopping there, it was time to make a little in the hoop doll for the dolls as well


Monster stuffy

Saw a similar pillow design in a book so decided to make one in the hoop.   Unfortunately the fleece was too thick to do the final sewing in the hoop but it wasn't too hard to finish with the sewing machine.

Ears and hands were done in one hooping 


The next stuffy/pillow is a Toothless from "How to train your dragon".  The ears and wings are felt.  We didn't have any black felt so covered dark blue felt with black broadcloth. The body needed the 8 x 12 hoop but I did all the wings and ears in one hooping of the 8 x 8.  It was late so forgot to take pictures while in the machine.   The eyes are a mix of appliqué and embroidery.  

Because the wings and ears were thinner I was able to sew the thing together in the hoop. 

Toothless is made out of minky so is very soft.  


After that it was time for a black cat.  

I wanted to keep the ears thin so used felt for the ears

Still no black felt so coveted front and back of the felt with black broadcloth and used a zigzag stitch for the edging. Black embroidery thread in the bobbin.   Ears hooped in 5x7 hoop.    

Eyes are appliqué.  Body done in 8x8 hoop. Stitched  together in the hoop


Lastly a penguin. Running out of black minky so only had enough for the wings and the front.  The back is a coordinating fabric and the white part is eyelet over white felt.  Wings are minky with tear away left in to give it some stiffness.  Wings hooped in 4x4 and the body in 8x8


Here's the group shot


Sunday 22 March 2015

Chainmaille pendants


I've spent the last day making chainmaille pendants since someone is using my embroidery machine.  

First up is called Victorian snowflake with a crystal centre


The next one I made is called Celtic Chrysanthemum.  


The next one I made is Sunburst.  I took the opportunity to add some colour. 


The last one is called Grandma's Rose.  I can add colour in the centre or around the edge.  I might try smaller earrings in this one next


Wednesday 18 March 2015

Ribbon alphabet - post #2

I decided to continue on my Ribbon Alphabet.  I have digitized all the letters, but have yet to stitch them out.

I also decided to test on the G (because it has straight & curvy lines)  to try 2 slightly different types of fill.

The one on the left is just one direction per section, the one on the right has a slight variation - trying to follow the ribbon direction.

Something weird happened near the bottom of the one on the right - I'll have to double check that one.


I'd love to hear your comments on which you prefer (minus the glitch on the bottom).

If you want to try stitching them out for yourself - I have the 2 G files for you to download.

NOTE: G - is the one on the left,   G 2 - is the one on the right.

Files in
.PES (version 2)
v10 orig.PES (version 10)
.JEF
.HUS


Monday 16 March 2015

Kids RW Alphabet from Lagrange aux loups

Kids RW Initial Alphabet from http://lagrange-aux-loups.over-blog.com     March 2015

NOTE: This is NOT my alphabet.  I am only linking to the individual blog entries for each letter to make it easier for people to find since not everyone is an expert in navigating blog sites - especially when they are in different languages.


You can start at one letter and scroll backwards or forewards - but there are some other designs in between.

Letter A for Apple
Letter B for Balloon
Letter C for Castle
Letter D for Dominos
Letter E for Earth
Letter F for Flowers
Letter G for Grapes
Letter H for Hats
Letter I for Ice Cream
Letter J for Jack in the Box
Letter K for Kite
Letter L for Leaves
Letter M for Mushroom
Letter N for Nest
Letter O for Orange
Letter P for Pinwheel
Letter Q for Queen
Letter R for Rose
Letter S for Snowman
Letter T for Train
Letter U for Umbrella
Letter V for Violin
Letter W for Watermelon
Letter X for Xylophone
Letter Y for Yo-Yo
Letter Z for Zipper

Saturday 14 March 2015

My next alphabet?


I've been trying to decide what type of Alphabet I should digitize next.  (I really should go back and try stitching out my Gold Panda Applique Alphabet

I stumbled on this Font and decided to see what it would look like stitched out.

I'm pretty happy with the result - It might just be my next project.  Any comments?


In the hoop projects


Lately I have been collecting lots of in the hoop projects - and lots of sites are sharing great ones for Easter.

I bought some felt and decided to bite the bullet...

Thanks to Britt Designs on their Yahoo & MeWe groups - they have been sharing these really cute In the Hoop Candy Holders.

My first attempt: the simple Egg.

It worked well - I didn't quite trim the inside properly - but it was good.  Only one small digitizing problem (look at the lower left blue block) - a newer version has been posted on MeWe to fix the problem.


Next up - the bigger chick Candy Holder.


Ooops - forgot to trim the final threads after putting on the vinyl - so they are showing through.  The problem with this one is that the vinyl started separating from the chick at the bottom of the centre.   I'm not sure if the vinyl I'm using is too flimsy - but I can change the zigzag around the vinyl to one that doesn't have as dense of stitching.


I decided that the egg as given - is a bit small and what is the point of having such a big embroidery hoop if I'm going to just stitch 4x4?  Last night I digitized my own bigger (5x7) egg.


This is the comparison in size between the eggs.


In a different note - I have also downloaded lots designs from ITH Design but hadn't actually tried any.  The hair clips and bobby pin covers looked intriguing.   They sew up quickly and have great instructions.


Happy Pi Day.

Once in a century   3.14.15 9:26:53


Sunday 8 March 2015

Candlewick Alphabet

 Alphabet from http://aufildemescreations.over-blog.com/    July 2013 - August 2014

NOTE: This is NOT my alphabet.  I am only linking to the individual blog entries for each letter to make it easier for people to find since not everyone is an expert in navigating blog sites - especially when they are in different languages.


Letter A
Letter B
Letter C
Letter D
Letter E
Letter F
Letter G
Letter H
Letter I
Letter J
Letter K
Letter L
Letters M & N
Letters O & P
Letters Q & R
Letters S & T
Letters U & V
Letter W & X
Letters Y & Z


Ornamental Alphabet

Ornamental  Alphabet from http://aufildemescreations.over-blog.com/    Nov - Dec 2014

NOTE: This is NOT my alphabet.  I am only linking to the individual blog entries for each letter to make it easier for people to find since not everyone is an expert in navigating blog sites - especially when they are in different languages.


Letter A
Letter B
Letter C
Letter D
Letter E
Letter F
Letter G
Letter H
Letter I
Letter J
Letter K
Letter L
Letter M
Letter N
Letter O
Letter P
Letter Q
Letter R
Letter S
Letter T
Letter U
Letter V
Letter W
Letter X
Letter Y
Letter Z


White alphabet from Lagrange aux loups

White Alphabet from http://lagrange-aux-loups.over-blog.com    Feb - March 2015

NOTE: This is NOT my alphabet.  I am only linking to the individual blog entries for each letter to make it easier for people to find since not everyone is an expert in navigating blog sites - especially when they are in different languages.


You can start at one letter and scroll backwards or forewards - but there are some other designs in between.

Letter A
Letter B
Letter C
Letter D
Letter E
Letter F
Letter G
Letter H
Letter I
Letter J
Letter K
Letter L
Letter M
Letter N
Letter O
Letter P
Letter Q
Letter R
Letter S
Letter T
Letter U
Letter V
Letter W
Letter X
Letter Y
Letter Z


Bébé Alphabet from La Grange aux Loups

Bébé Alphabet from http://lagrange-aux-loups.over-blog.com     March 2015

NOTE: This is NOT my alphabet.  I am only linking to the individual blog entries for each letter to make it easier for people to find since not everyone is an expert in navigating blog sites - especially when they are in different languages.


You can start at one letter and scroll backwards or forewards - but there are some other designs in between.

Letter A
Letter B
Letter C
Letter D
Letter E
Letter F
Letter G
Letter H
Letter I
Letter J
Letter K
Letter L
Letter M
Letter N
Letter O
Letter P
Letter Q
Letter R
Letter S
Letter T
Letter U
Letter V
Letter W
Letter X
Letter Y
Letter Z


Easter Egg Alphabet from La Grange Aux Loups

Easter Egg Alphabet from http://lagrange-aux-loups.over-blog.com     March 2015

NOTE: This is NOT my alphabet.  I am only linking to the individual blog entries for each letter to make it easier for people to find since not everyone is an expert in navigating blog sites - especially when they are in different languages.


You can start at one letter and scroll backwards or forewards - but there are some other designs in between.   THERE ARE AWESOME LOOKING EASTER EGGS mixed in between these letters!


Letters A - C
Letters D - F
Letters G - I
Letters J - L
Letters M - O
Letters P - R
Letters S - U
Letters V - X
Letters Y & Z

Tuesday 3 March 2015

More Alphabet digitizing


A month ago I got Palette version 10 - a BIG upgrade from my version 2 software!  I've been having fun with different aspects of the software.

One of the fun things I've been playing with is the auto-digitizing of True Type Fonts.

Last night I was looking at some fonts and playing around with digitizing the A of some that appealed to me.   Some of these are straight out of the software - while others had some work done to them.

Disney Cross Stitch   I've digitized upper case, lower case and punctuation in this with 2.5 mm "X"s  I like it so much, I'm working on digitizing 1.5 mm "X"s so also have a more dense version of this.


Applique Gold Panda Font  Yesterday I posted about digitizing this font.  This is what started me looking for more interesting fonts to digitize.   I have finished all the letters, numbers and various punctuation, but haven't tested most of it.  I love the versatility out of one design


Applique Academy Engraved. I liked the look of the partial applique alphabet, so was looking for more that would allow this (A fully applique letter can be a pain - as you have to cut out the insides)
I had a little problem with my starting thread appearing later on - but you get the idea.  


SBC Curly Outline:   I found this one - and figured it could be an applique. Once I digitized it, I realized that it would also work well as a filled font.  Since the Capital A is kind of different, I decided to digitize the B instead.   The outline satin stitch isn't very wide - so I needed to be a little bit better with the Applique version.


Scruff: While looking for fonts to applique, I kept seeing this font and I thought it would be fun and funky - so really wanted to see how well it digitized.  I might just have to use this one sometime.


Fairytale:  This one also looked interesting.  I had some thread issues on the test stitchout - so the jury is out on this one.


AR Delaney:   I tried digitizing this one as a fill or satin - wasn't happy with either - so I settled on a mixture of the two:


Highlight LET: Fairly simple, but I do like the result


Odessa:  This one doesn't look like much - but does make for a simple, elegant font


Cerbature: I'm not so sure why I decided to try this one - maybe I was thinking it could lead to a filled font like I did with the SBC Curly one.  It worked fine


Victorian: I like the way this one turned out.


Vivaldi:     This font looked like it would digitize nicely - did not disappoint.


Pump Font:  This one leads itself to lots of  fun ideas for different fills, spiral stiches, etc.   I tried the lower case a in 2 simple versions:


Sweetheart Love Letters: This is a relatively new font.   To be able to give away or sell these letters, I would need to purchase a license.   Emily Spadoni is the creator and has a lot of very lovely fonts.


Thanks for checking out my latest projects.  I would love any comments you have.  Which fonts appeal to you and why?  What sizes of letters do you like?